

Comfort Food, One Sweet Bite at a Time
Martha Washington Candies aren’t just sweets they’re bite-sized memories wrapped in chocolate. Old-fashioned yet timeless, these treats blend coconut, pecans, and cherries into rich, velvety centers dipped in silky chocolate. And around here at Cozzy Recipes, they fit right in with the kind of no-fuss, full-flavor food that makes people feel at home.
Hi, I’m Chef Dija Louchi, the flavor-obsessed home cook behind Cozzy Recipes. I didn’t come from a professional kitchen I came from one filled with laughter, love, and a lot of creative meals using whatever was in the fridge. My first kitchen win? A pasta sauce that didn’t burn. My first real fail? Let’s just say the smoke alarm still remembers.
But I never stopped cooking. It’s not about nailing perfection it’s about stirring up comfort and serving it with a smile. It’s about warmth, sharing, and joy. That’s why I created Cozzy Recipes a place where home cooks can feel empowered, inspired, and maybe even laugh a little when a recipe goes sideways.
With this recipe and guide, I’m bringing back Martha Washington Candies not just as a holiday treat, but as a year-round comfort bite. Whether you’re nostalgic for grandma’s candy tray or discovering these gems for the first time, you’re in for something cozy, chocolatey, and utterly irresistible.
In this article, you’ll learn:
- The charming history behind the name
- Step-by-step guide to making them at home plus smart ingredient swaps that actually work.
- Smart storage tips (yes, we’ll answer if they need refrigerating)
- Modern twists to update the classic
- Plus, we’ll cover all your top questions about Martha Washington candies from storage to history and more.
Let’s dive into the sweet story behind this beloved candy…
Table of Contents
PART 1: The Sweet Origin of Martha Washington Candies
Print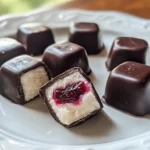
Martha Washington Candies
Description
Martha Washington Candy is an easy to make old fashioned candy that is perfect for the holidays! Made with coconut, pecans and cherries, this easy candy recipe is ideal for gift giving and looks impressive on a cookie tray! A must make for Christmas!
Ingredients
2 cups (227g) powdered sugar
4 tablespoons (1/2 stick) unsalted butter, melted
7 ounces (1/2 can) sweetened condensed milk
1/2 teaspoon vanilla extract
1 cup coconut flakes (sweetened or unsweetened)
1 cup chopped pecans
2 1/2 cups chocolate-flavored melting wafers (milk chocolate or dark chocolate)
Instructions
- Chop cherries into small pieces and place on a paper towel so the liquid can be absorbed. Blot dry with additional paper towels.
- Combine all ingredients except for candy coating in a large bowl.
- Refrigerate for at least two hours. The colder the filling is the quicker the chocolate will set up.
- Form into balls about the size of a walnut or about 1 inch in size. Refrigerate balls for 20 minutes.
- Line baking sheet with parchment paper. Melt candy melts according to package directions.
- Dip balls into chocolate, tap off excess, and place on lined baking sheet to set up. Get off as much chocolate as you can otherwise it will pool at the bottom of the candy and you’ll have to trim it off.
- Repeat until all balls are covered in chocolate.Store candies in airtight container at room temperature for up to 2 weeks.
- Store candies in airtight container at room temperature for up to 2 weeks.
Notes
Where Did Martha Washington Candies Come From?
Despite the elegant name, Martha Washington Candies likely didn’t come from the first First Lady’s own recipe collection. In fact, these rich, chocolate-covered bites have more to do with old-fashioned American candy shops than early American kitchens.
The name became popular in the early 1900s when candy companies began marketing luxurious, handcrafted treats using well-known historical names to evoke tradition and nostalgia. “Martha Washington Candies” sounded wholesome, classic, and patriotic and people ate it up, literally.
Back in the 1920s, a candy company named after Martha Washington began selling handcrafted sweets think creamy centers and chocolate-dipped bonbons. The name caught on quickly, turning these treats into a nationwide favorite.
So, while Martha herself might not have dipped cherries in chocolate, the candies named after her became a cherished staple in American homes especially around holidays like Christmas and Easter.
Why They’ve Stood the Test of Time
There’s something timeless about this recipe. With just a few pantry staples coconut, sweetened condensed milk, cherries, and chocolate you can whip up a batch that tastes like it came from grandma’s candy tin.
These candies hit all the nostalgic notes:
- Sweet but not cloying
- Rich but balanced with crunch
- Pretty enough for gifting, easy enough for everyday
They’ve become a holiday tradition in many Southern households and often show up at cookie exchanges, bake sales, and homemade candy trays.
And thanks to their simplicity, they’re a great entry point for new home cooks. Want to impress your guests without stressing over caramel temperatures or candy thermometers? Martha Washington Candies are your new best friend.
A Treat Passed Down with Love
Like many vintage recipes, Martha Washington Candies often come with handwritten notes, flour-dusted index cards, and a bit of family lore. Maybe your grandma added chopped walnuts. Maybe your aunt left out the cherries. Each family puts their own little spin on it, and that’s what makes it special.
This candy is less about historical accuracy and more about shared experience. Every batch carries a little tradition and a lot of heart.
Ingredients You’ll Need (and Smart Substitutes)
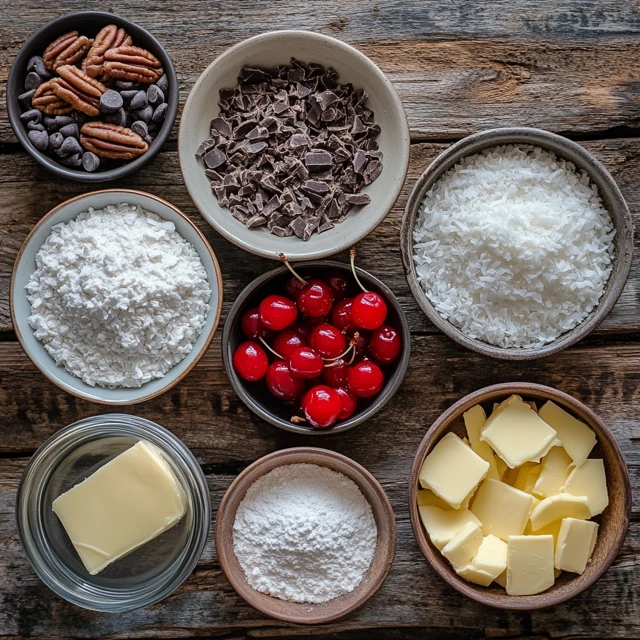
The Classic Martha Washington Candy Line-Up
To make Martha Washington Candies the old-fashioned way, you only need a handful of pantry staples no candy thermometer, no fuss. Here’s what goes into the traditional version:
| Ingredient | Purpose |
|---|---|
| Sweetened Condensed Milk | Binds and sweetens the filling |
| Unsweetened Shredded Coconut | Adds texture and that classic chew |
| Chopped Pecans or Walnuts | For crunch and nutty richness |
| Maraschino Cherries (chopped) | Brings sweetness, color, and a nostalgic vibe |
| Butter (softened) | Helps with creaminess and binding |
| Powdered Sugar | Firms up the mixture and balances the flavors |
| Semi-Sweet or Dark Chocolate | Used for dipping the centers |
| Coconut Oil or Shortening (optional) | Thins the chocolate for smoother coating |
Each ingredient has a job together, they create that smooth, chewy center with a crackly chocolate shell.
Smart Ingredient Swaps That Still Taste Amazing
Let’s be real: sometimes you’re short an ingredient or just want to change things up. Good news? This recipe is super forgiving. Here are some cozy swaps:
- No sweetened condensed milk? Use full-fat coconut milk reduced down with sugar until thickened.
- Allergic to nuts? Try crushed pretzels or sunflower seeds for crunch without allergens.
- Want it dairy-free? Use vegan butter and plant-based chocolate chips.
- No maraschino cherries? Use dried cherries or cranberries just soak them in warm water or orange juice first to plump them up.
- Need it less sweet? Try using dark chocolate for a richer bite and cut back a bit on the powdered sugar if you prefer less sweetness.
These candies are flexible enough to fit your pantry, diet, or mood.
👉 Discover great ideas like our Elote Pasta Salad if you’re into bold, creamy flavors with a twist.
Tip: Chill That Mixture First
Once your filling is mixed, pop it in the fridge for at least 30 minutes. This helps it firm up so you can roll it into balls without a sticky mess. Trust me trying to dip warm filling into melted chocolate is not cozy.
“Try using dark chocolate for a richer bite and cut back a bit on the powdered sugar if you prefer less sweetness.”
Step-by-Step Recipe for Martha Washington Candies (With Tips for Success)
Let’s Make Some Magic The Cozy Way
Making Martha Washington Candies is surprisingly simple. No candy thermometer, no stovetop drama just mix, chill, roll, dip, and enjoy. This is comfort candy, not culinary stress.
Here’s the step-by-step method, Cozzy-style.
Step 1: Gather Your Ingredients
You’ll need:
- 1 can (14 oz) sweetened condensed milk
- 1 stick (½ cup) unsalted butter, softened
- 1 package (14 oz) shredded coconut (unsweetened or sweetened, your call)
- Grab a standard 10 oz jar of maraschino cherries, pour off the liquid, and chop them into small bits.
- 2 cups chopped pecans or walnuts
- 6 cups powdered sugar
- 3 cups semi-sweet or dark chocolate chips
- 1 tablespoon coconut oil or shortening (optional, for smooth dipping)
👉 Looking for a cozy dinner pairing? Try our Bush’s Baked Beans Recipe for a savory classic.
Step 2: Make the Filling
In a large mixing bowl, cream the butter and sweetened condensed milk together until smooth.
Add in the powdered sugar gradually, stirring to avoid lumps. Mix in the coconut, diced cherries, and chopped nuts gently until everything is blended throughout. It should be thick and sticky.
Cozzy Tip: If the mix feels too soft to shape, add a little extra powdered sugar until it holds its form.
Step 3: Chill the Dough
Seal the bowl and place it in the fridge for 30 minutes or more to let the mixture set properly. Cooling it down first means less stickiness and smoother rolling.
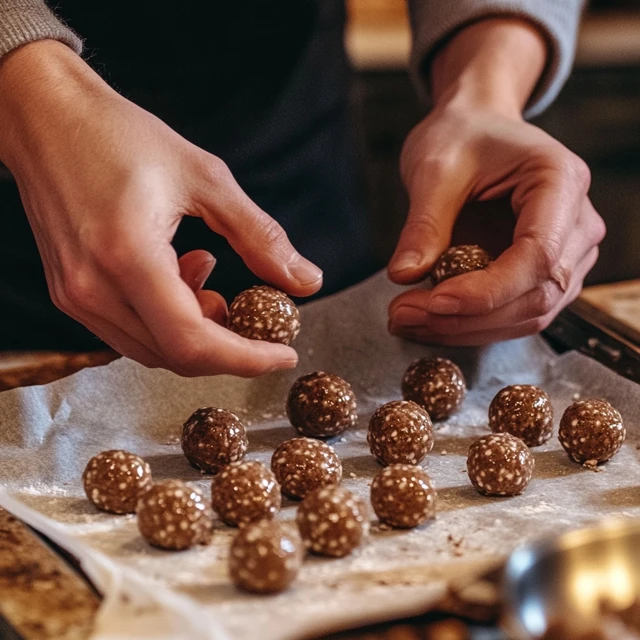
Step 4: Shape the Centers
Once the filling is firm, scoop out a tablespoon and shape it into a ball using your hands. Place them on a parchment-lined baking sheet.
After you’ve rolled all the candy balls, place them in the fridge to firm up or use the freezer for a quicker chill while you melt the chocolate.
Step 5: Melt and Dip the Chocolate
Melt the chocolate chips with the coconut oil in a microwave-safe bowl or over a double boiler, stirring gently until it’s silky and smooth.
Using a fork or candy dipping tool, lower each candy center into the chocolate, roll to coat, and gently lift out. Let excess chocolate drip off before placing them back on the parchment.
Step 6: Let Them Set
Allow the candies to set at room temperature or in the fridge until the chocolate is firm. Once set, store in an airtight container.
These little treats can stay fresh in the fridge for about two weeks though they’re usually gone much sooner.
Extra Cozy Tips for Success
- Use a cookie scoop for evenly sized balls they’ll look professional with zero effort.
- Dip quickly the colder the center, the easier it is to coat.
- Add flair by sprinkling sea salt, crushed nuts, or holiday sprinkles on top before the chocolate sets.
Storage, Shelf Life & Gifting Tips
How to Store Martha Washington Candies the Right Way
Once your Martha Washington Candies are dipped, set, and looking like little chocolate gems, the next step is keeping them fresh and fabulous.
Here’s the cozy kitchen-tested way to store them:
- Refrigerator (Best Option):
Place your Martha Washington Candies in a single layer inside an airtight container. If stacking, separate layers with parchment paper to prevent sticking. In the fridge, they’ll stay fresh for up to 2 weeks although these chocolate-dipped Martha Washington Candies tend to vanish much sooner. - Freezer (Make-Ahead Friendly):
Want to get ahead of the holiday rush? Freeze your Martha Washington Candies in a freezer-safe container. Use parchment between the layers and seal well. Stored this way, these nostalgic treats will hold up for about 2 months. Before serving, move the frozen Martha Washington Candies to the fridge and let them thaw gently overnight.
Gifting Ideas for Every Occasion
These classic Martha Washington Candies are more than just a homemade sweet they’re also one of the easiest (and most heartfelt) edible gifts you can share.
Here’s how to turn your Martha Washington Candies into thoughtful little gifts:
| Occasion | Packaging Tip |
|---|---|
| Holidays | Tuck your candies into festive tins or cellophane bags tied with ribbon |
| Birthdays | Add them to a colorful treat box lined with cupcake wrappers |
| Bake Sales | Wrap 3–5 Martha Washington Candies in parchment and tie with twine |
| Hostess Gifts | Fill a small glass jar with the candies and top with a handwritten tag |
Each batch of Martha Washington Candies is bite-sized comfort and when gifted, they’re like passing along a bit of kitchen joy.
Avoiding Chocolate Melt and Bloom
If you’re storing your Martha Washington Candies outside the fridge for a short time like for a party or packaging gifts choose a cool, dry spot away from heat or sunlight.
Cozzy Tip: Chocolate bloom (those whitish streaks) can happen if your Martha Washington Candies experience temperature changes. It’s safe to eat, but refrigerating helps keep them looking shiny and fresh.
Make-Ahead and Freeze for Later
Whip up a larger batch now so you’ve got extra ready whenever you need it. Keep some in the freezer so there’s always a comforting Martha Washington Candy ready when you need it.
Perfect! Let’s move forward with:
Creative Spins on Martha Washington Candies: Fresh Flavors to Try
Add a Fresh Spin Without Losing the Nostalgia
While traditional Martha Washington Candies are already pretty perfect, it’s always fun to put your own twist on a classic. Whether you’re changing up flavors for the holidays, tweaking ingredients to fit dietary needs, or just having fun in the kitchen, these variations bring something new without losing that cozy, old-fashioned charm.
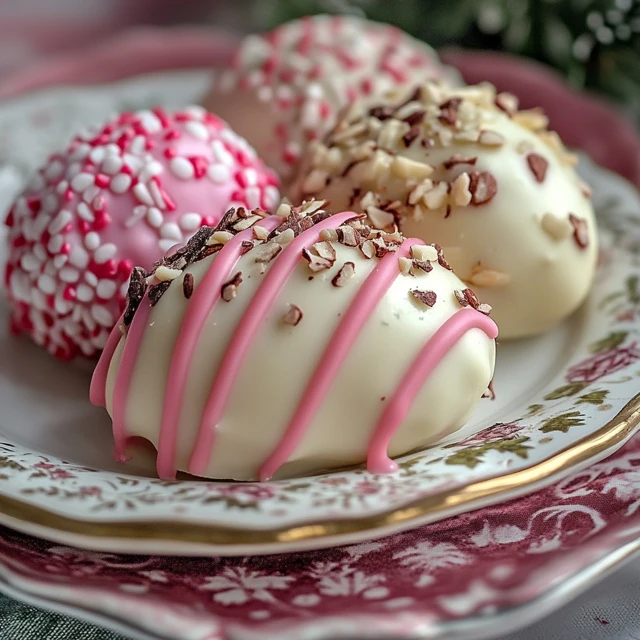
1. Chocolate Lovers’ Dream: Double-Dip Delight
Dip your candies once in dark chocolate, let them set, then dip them again in white chocolate. It adds a beautiful marbled finish and gives a bold, creamy contrast.
Optional Toppings: Mini chocolate chips, cocoa nibs, or a drizzle of espresso glaze.
2. Cherry-Almond Swirl
Swap the pecans for slivered almonds and add a drop of almond extract to the filling. It enhances the cherry flavor and gives the candy a subtle amaretto vibe.
Perfect for Valentine’s Day or any cherry lover.
3. Tropical Twist
Turn your Martha Washington Candies into tropical bites by using dried pineapple or mango instead of cherries. Add a dash of lime zest to brighten up the flavor.
Try this for: Summer parties, luau themes, or a fun vacation-inspired treat.
4. Holiday Spiced Candies
Stir in a hint of cinnamon or nutmeg to bring warm, festive notes to the mix. You can even toss in crushed ginger cookies or a hint of orange zest for that unmistakable festive flavor.
These make fantastic Christmas candy tray additions.
5. Nut-Free & Kid-Friendly
Omit the nuts entirely and replace them with crushed graham crackers or puffed rice for crunch without allergens. They’re just as tasty and a hit with little ones.
Looking for inspiration? Try our Wagyu Burger Guide another cozy twist on a classic that surprises every time.
6. Keto-Friendly Adjustments
Swap the sweetened condensed milk for a low-carb version, use unsweetened coconut, sugar-free chocolate chips, and a low-carb sweetener like powdered erythritol. Still indulgent, still cozy just friendlier to your macros.
Even with these variations, the heart of Martha Washington Candies remains rich, comforting, and crafted with care. They’re the kind of recipe that welcomes creativity but never loses its roots.
Troubleshooting Common Mistakes (So Your Martha Washington Candies Don’t Fall Apart)
Even though Martha Washington Candies are beginner-friendly, a few simple missteps can lead to sticky hands, soft centers, or uneven coatings. Here’s your cozy troubleshooting guide to help keep each batch smooth, firm, and picture-perfect (well, close enough!).
1. The Mixture Is Too Soft to Roll
What’s happening?
If the filling is sticky and won’t hold its shape, it likely needs more chilling or a bit more powdered sugar.
Quick fix:
Pop the bowl back into the fridge for another 20–30 minutes, or mix in a few extra spoonfuls of powdered sugar until the texture firms up.
2. Chocolate Coating Too Thick or Lumpy
What’s happening?
Your chocolate might be overheated or missing a thinning agent.
Quick fix:
Mix in about a tablespoon of coconut oil or shortening to help your chocolate melt into a smooth coating. This will make it smoother and easier to dip your Martha Washington Candies.
Bonus tip:
Always melt chocolate slowly either in 30-second microwave bursts or over a gentle double boiler heat.
3. Candies Aren’t Holding Their Shape
What’s happening?
Warm hands, soft filling, or skipping the chill step.
Quick fix:
Let the rolled candy balls rest in the fridge or freezer for about 15 minutes so they’re firm enough to dip easily. That helps them stay solid when they hit warm chocolate.
4. Chocolate Cracks After Setting
What’s happening?
Temperature shock dipping cold filling into very hot chocolate.
Quick fix:
Let the filling sit at room temp for 5 minutes before dipping, and make sure your chocolate isn’t piping hot. A smooth coating starts with balance.
5. Too Sweet?
What’s happening?
Some versions of Martha Washington Candies can turn out a bit too sugary, depending on your ingredients.
Quick fix:
Use dark chocolate for the coating, unsweetened coconut, or cut back slightly on powdered sugar to balance the sweetness.
👉 Looking for bold, savory flavor to balance your sweet treats? Don’t miss our Elote Pasta Salad for a spicy-creamy side dish twist.
6. Candy Shell Has White Streaks (Chocolate Bloom)
What’s happening?
That’s bloom caused by moisture or temperature changes.
Quick fix:
It’s totally harmless, but if you want shiny candies, store them in a cool, dry place or refrigerate immediately after dipping.
A couple of easy tweaks is all it takes to get your Martha Washington Candies just right creamy, chocolatey, and full of that old-fashioned goodness.
When to Make Martha Washington Candies (Best Occasions & Seasonal Uses)
A Treat for Every Season and Reason
Martha Washington Candies aren’t just for holidays. Sure, they shine on cookie platters in December, but these sweet bites are cozy enough to make all year long. Here’s when they’re especially perfect:
1. Christmas & Winter Holidays
It’s the time of year when Martha Washington Candies truly shine. Their chocolatey shells and creamy, festive filling fit perfectly on holiday dessert tables or in gift tins for neighbors, coworkers, and friends.
👉 Pro tip: Make them early and freeze them they’re holiday-ready when you are.
2. Valentine’s Day
With cherries in the mix and chocolate on the outside, these candies are love in a bite. Use heart-shaped boxes or add a splash of pink-tinted white chocolate to make them feel extra special.
3. Easter & Spring Brunches
Their bite-sized shape and pastel possibilities make Martha Washington Candies a hit at springtime gatherings. Use colorful sprinkles or wrap them in pastel foils for a sweet seasonal look.
4. Summer Parties & Showers
Swap in tropical fruit or citrus zest for a lighter summer take. These candies make great favors for baby showers, bridal events, or garden parties when chilled.
5. Anytime You Need a Nostalgic Pick-Me-Up
Rainy day? Long week? Surprise guests? Keep a stash in your freezer and enjoy a bite of chocolate-covered comfort any time.
These candies aren’t just a dessert they’re a little piece of tradition, a little bit of indulgence, and a whole lot of cozy. Whether you make them for others or for yourself, Martha Washington Candies always fit the moment.
Conclusion & Final Thoughts
Martha Washington Candies aren’t just a treat they’re a tradition. From their creamy, coconut-cherry filling to their smooth chocolate coating, these nostalgic sweets bring generations of flavor and comfort to every bite. Whether you stick with the classic recipe or try a creative twist, they’re the kind of homemade candy that never goes out of style.
They’re easy enough for beginners, festive enough for the holidays, and cozy enough to keep on hand year-round. Plus, they store well, gift beautifully, and always make someone smile even if that someone is you.
So the next time you’re craving something sweet and special, don’t overthink it. Just roll up your sleeves, chill the filling, melt that chocolate, and let Martha Washington Candies bring a little joy to your kitchen.
👉 Looking for more comfort food inspiration? Don’t miss our Cheesesteak Pasta rich, cheesy, and just the thing to follow up your sweet treat.
For more recipes follow me in Facebook and Pinterest
Frequently Asked Questions About Martha Washington Candies
Why are they called Martha Washington candy?
Despite the name, there’s no confirmed historical record that Martha Washington herself created these candies. The name likely comes from candy shops in the early 1900s that used her name to evoke a sense of homemade charm and old-fashioned tradition. It became a popular branding strategy and it stuck.
Does Martha Washington candy have to be refrigerated?
Yes, especially if you’ve used sweetened condensed milk and fresh ingredients like cherries. Refrigeration helps the candies hold their shape and keeps the chocolate coating firm. They’ll stay freshest in the fridge for up to 2 weeks, or in the freezer for up to 2 months.
What was Martha Washington’s favorite food?
Historically, Martha Washington was known to enjoy hearty, comforting meals like roast meats, puddings, and seasonal vegetables. While there’s no record of her enjoying these specific candies, the name simply ties back to a vintage-inspired feel rather than her personal preferences.
What is a Martha Washington ball?
A Martha Washington ball refers to the round, chocolate-coated version of these candies typically filled with a mixture of coconut, cherries, nuts, butter, and powdered sugar. They’re shaped into bite-sized balls, chilled, and then dipped in chocolate. Think of them as little bites of nostalgic comfort wrapped in a chocolate shell.